The Nude Secret To Flawless Hair: Clip-On Extensions Installation Exposed!
Have you ever wondered how celebrities and influencers achieve those stunning, voluminous locks that seem to defy gravity? The secret might be simpler than you think! Clip-in hair extensions have revolutionized the beauty industry, offering a quick and easy way to transform your look without the commitment of permanent extensions. But here's the catch: not all installation methods are created equal. In this comprehensive guide, we're pulling back the curtain on the professional techniques that will take your clip-in game from amateur to red-carpet ready. Are you ready to unlock the "nude secret" to flawless hair?
The Professional's Guide to Clip-In Hair Extensions Installation
Understanding Clip-In Hair Extensions
Before we dive into the installation process, let's take a moment to understand what clip-in hair extensions are and why they've become so popular. These extensions consist of wefts of hair attached to small, pressure-sensitive clips. They're designed to be easily clipped into your natural hair, providing instant length, volume, and even color without the need for salon visits or long-term commitment.
The beauty of clip-ins lies in their versatility. Whether you're looking to add some oomph to your everyday style or create a dramatic look for a special occasion, these extensions can be your best friend. Plus, with proper care, a high-quality set can last for months, making them a cost-effective solution for those who love to switch up their look.
- Filmyfly New South Movie Hindi Dubbed Download
- My Secret Sex Life Leaked How I Survived The Ultimate Betrayal
- Jarrod And Brandi Storage Wars
The Nude Secret: Professional Installation Techniques
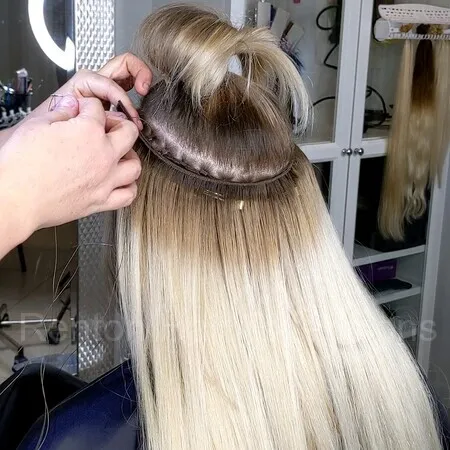
Now, let's get to the heart of the matter: the professional installation techniques that will make your clip-ins look like they grew right out of your head. The key to a seamless look lies in the placement and blending of the extensions. Here's a step-by-step guide to achieving that coveted "nude" look:
Preparation is Key: Start with clean, dry, and styled hair. If you're planning to curl or straighten your hair, do this before applying the extensions. This ensures that your natural hair and the extensions blend seamlessly.
Section Strategically: Divide your hair into sections, starting from the nape of your neck. Use alligator clips to keep the upper sections out of the way. This methodical approach ensures even distribution of the extensions.
Tease for Grip: Before clipping in each weft, tease the roots of your natural hair slightly. This creates a rougher surface for the clips to grip, preventing slippage throughout the day.
Mind the Placement: Start with the larger wefts at the back of your head, working your way up. The key is to place the extensions where they'll be most effective in adding volume and length, typically around the occipital bone (the bump at the back of your head).
Blend and Layer: As you move up the head, use smaller wefts and place them strategically to create a layered look. This mimics natural hair growth patterns and ensures a more realistic appearance.
Frame Your Face: Use the smallest wefts or single clips to add volume around your face. This step is crucial for achieving that "born with it" look.
Remember, the goal is to make the extensions undetectable. With practice, you'll be able to install your clip-ins in minutes, achieving a flawless look every time.
Tailoring the Technique to Your Hair Type
One of the most common questions about clip-in extensions is whether they work for all hair types. The answer is a resounding yes! However, the technique does need to be adjusted based on your hair's texture and thickness. Let's break it down:
Fine Hair
If you have fine hair, you might worry about the extensions being visible or slipping out. Here are some tips to ensure a perfect fit:
- Use a texturizing spray before installation to add grip.
- Opt for smaller wefts and use more of them to distribute weight evenly.
- Consider backcombing more aggressively to create a stronger base for the clips.
- Try a zigzag part instead of a straight part to help hide the wefts.
Thick Hair
Those with thick, voluminous hair might find it challenging to get the extensions to blend seamlessly. Here's how to tackle this:
- Use larger wefts to make an impact against your natural volume.
- Consider using fewer pieces but placing them strategically.
- Focus on length rather than volume, as your natural hair likely already has plenty of body.
- Experiment with different textures of extensions to match your hair's natural pattern.
Essential Tips for Flawless Installation
Now that we've covered the basics, let's dive into some insider tips that will elevate your clip-in game:
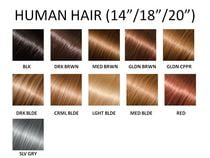
Invest in Quality: Not all extensions are created equal. Look for 100% human hair extensions for the most natural look and feel. They can be styled with heat tools and will blend more seamlessly with your natural hair.
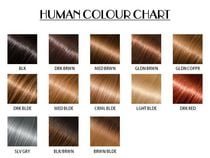
Color Match Carefully: When choosing your extensions, don't just match your base color. Look for pieces that have subtle highlights and lowlights similar to your natural hair for a more dimensional look.
Practice Makes Perfect: Don't be discouraged if your first few attempts aren't flawless. Like any skill, installing clip-ins takes practice. Set aside some time to experiment with different techniques and placements.
Consider Your Hairstyle: The way you plan to style your hair will affect how you install the extensions. For updos, you might need to place wefts higher on the head. For braids, focus on adding thickness to the sides.
Use the Right Tools: Keep a rat-tail comb for precise sectioning, a teasing brush for creating grip, and small hair elastics on hand for any necessary touch-ups.
Maintenance and Care: Keeping Your Extensions Looking Fresh
Installing your clip-ins is just the first step. To keep them looking their best, proper maintenance is crucial. Here are some best practices for extension care:
Gentle Brushing: Use a loop brush or a wide-tooth comb to detangle your extensions. Start from the ends and work your way up to prevent breakage.
Proper Washing: Wash your extensions every 15-20 wears, or when they start to look dull. Use sulfate-free, extension-safe products and be gentle to avoid tangling.
Smart Storage: When not in use, store your extensions in a cool, dry place. Use a hanger or a specialized extension case to prevent tangling and dust accumulation.
Regular Trims: Just like your natural hair, extensions can develop split ends. Take them to a professional stylist for occasional trims to keep them looking fresh.
Heat Protection: Always use a heat protectant spray before styling with hot tools. This is especially important for extensions, as they don't have natural oils to protect them.
Troubleshooting Common Issues
Even with the best techniques, you might encounter some challenges. Here's how to troubleshoot common issues:
- Slippage: If your extensions are slipping out, try teasing your roots more or using a dry shampoo at the roots for extra grip.
- Visible Wefts: If you can see the wefts, try lowering them slightly or using a concealer pencil that matches your scalp to camouflage the tracks.
- Tangling: Prevent tangling by brushing regularly and using a leave-in conditioner. At night, braid your hair or put it in a loose ponytail to minimize friction.
Conclusion: Mastering the Art of Clip-In Extensions
There you have it – the "nude secret" to flawless hair with clip-in extensions, exposed! By following these professional techniques and tips, you're well on your way to achieving that coveted, seamless look. Remember, the key lies in strategic placement, proper blending, and choosing quality extensions that match your hair type and desired style.
Whether you're preparing for a special event or just want to elevate your everyday look, mastering the art of clip-in extensions can be a game-changer. With practice and patience, you'll soon be installing your extensions like a pro, enjoying voluminous, luscious locks that look and feel completely natural.
So, are you ready to transform your hair game? Grab your clip-ins, follow these steps, and get ready to turn heads with your flawless, professionally-installed extensions. Here's to endless good hair days ahead!